There has been much controversy recently in the area of Dental Loss Ratios with Dental Insurance companies. This brief article will attempt to lay out the sequence of events along with the key disagreements along the way.
The concept of a Dental Loss Ratio (DLR) refers to a strategy to attempt to force insurance companies to prioritize funding going toward patient care. Specifically, it refers to a metric of how much of the company’s total spending is actually going toward patient care versus other administrative efforts like marketing, executive salaries, etc.
The strategy has its roots in the Affordable Care Act passed in 2010. The ACA implemented a Medical Loss Ratio with the intent of holding health insurance companies accountable.
Over the years, there have been a number of states that have attempted to create and pass legislation that would force insurance companies to report and operate to a certain Dental Loss Ratio. However, most of these efforts either stalled in the law-making process, or became significantly watered down by the time anything actually passed.
The National Association of Dental Plans (NADP), not surprisingly, has fought against the concept of Dental Loss Ratio guidelines. Their stated reasoning is that implementing these laws would add additional administrative costs and would also prevent smaller insurers from playing a role in the market.
In November of 2022, Massachusetts initiated a direct ballot initiative, many times referred to as “Question 2” on the ballot. This ballot measure required dental health insurance companies to maintain a Dental Loss Ratio of at least 83%. In other words, the companies had to spend at least 83% of their total budget on patient care. If they failed to do so, they were required to rebate the difference directly to patients. The ballot measure passed overwhelmingly.
The group that spearheaded the ballot initiative in Massachusetts thought this law could serve as an ideal model for other states to implement. The ADA, who supported the efforts in Massachusetts, agreed, and set about to create a model that could be implemented in other states.
However, the path that the ADA took to create a Dental Loss Ratio implementation model created controversy in the dental community. In particular, the group who spearheaded the effort in Massachusetts, led by Dr. Mouhab Rizkallah, became outspoken critics of the ADA strategy. [https://www.tdmr.org/ada-under-fire-for-dental-loss-ratio-compromise/]
The crux of the disagreement lies in how aggressive the model should be toward the insurance providers, and how much the NADP should have been involved in the process. In addition, there is frustration on the part of the group that lead the Massachusetts effort that they were not involved in the ADA effort.
The ADA worked with the National Council of Insurance Legislators (NCOIL) to develop the model of how to implement the DLR. The NCOIL pushed the ADA to gain agreement from the NADP.
The resulting model that was agreed to by the NADP was touted by the ADA as a victory because they felt it improved insurance company accountability by forcing insurance companies to measure DLRs and report DLRs to regulators. The model also gives a commissioner the ability to “…take remediation or enforcement actions against [insurers], including ordering such carriers to rebate…” [https://ncoil.org/wp-content/uploads/2024/01/NCOIL-DLR-Model-Health-Cmte-Adopted-1-26-24.pdf]
Criticisms of the approach, and the resulting model, include:
- The definition of the DLR allows the insurer to remove costs going toward “non-profit” work from the denominator. There are some that believe this would give insurers the ability to funnel administrative costs into this bucket so as to inflate their DLR – which may erode accountability toward patient care.
- Key DLR metrics are calculated based on averages over 3 years, and targets are based on relative industry and market averages as opposed to absolute numbers. Some feel that this long time period will delay the corrective action that is desired. Furthermore, critics feel that fluctuating targets create more opportunity for gaming the system and create less accountability.
- Some felt that the process to create the model was not as transparent as it could have been, as many key stakeholders felt they were not involved. In particular, the group who led the implementation of the DLR in Massachusetts felt that they should have been more involved in the process.
- Some also questioned whether the ADA was aggressive enough with the NADP, and if perhaps there was too much collaboration between these organizations. For instance, Dr. Rizkallah pointed to the fact that there was never any agreement from the NADP in the Massachusetts initiative and that the result is more aggressive as a result of this independence.
In response to this, the ADA pointed out that the Massachusetts initiative was enacted based on a mechanism that allowed a ballot measure to be directly voted upon by the people. They pointed out that there are only 14 states that even have this option. Furthermore, even for those states where it did apply, they felt that direct ballot initiatives were extremely risky. It appears that the ADA’s intent was to create a model that could withstand the legislative process across most states.
As a result of the disagreement between some dentists and the ADA, a petition was created that received over 1300 signatures to prevent ratification of the ADA-recommended DLR model. However, at the NCOIL meeting in April, it appears that it was ratified.
According to the ADA, Illinois, Nebraska, New York, Oklahoma, Pennsylvania, Rhode Island, Virginia, Washington and West Virginia have introduced DLR legislation in 2024. Arizona, Colorado and Nevada adopted legislation in 2023, and New Mexico adopted legislation in 2022.
They say that nearly all of the bills would set a minimum ratio that dental plans must meet, with a corresponding rebate requirement for plans spending less than that minimum.
Make sure you stay updated on the latest in the dental industry by subscribing
 A rectangular collimator is typically an adapter that can be placed over the round cone of a dental intraoral x-ray source that limits the radiation being emitted to a smaller rectangular shape. The purpose is to reduce patient radiation by limiting the x-ray to only the radiation that will hit the sensor (or film).
 X-ray Source:
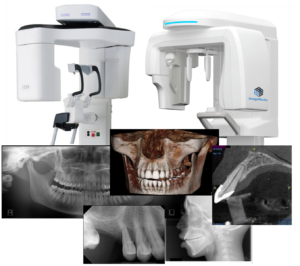 Extraoral x-ray machines position the sensor outside the mouth. The most common type of extraoral dental x-ray is the panoramic x-ray machine, where the patient rests their chin on a chinrest, and an automated scan occurs with the x-ray source on one side of the head and the sensor on the other side.