EvaSoft 4.0 Training Videos

Introduction to EvaSoft 4.0

Opening Volumes and Projects.

Navigating the Software Part 1

View Images in of the Various Tabs and Views.

Navigating the Software Part 2

Navigating the Location within the Volume, and Changing the Angle of the View.

Navigating the Software Part 3

Manipulating the 3D Reconstruction.

Tracing the Arch

Tracing the Nerve

Measurement Toolbar

Point to Point Measurement,  Tape Measurement,  Point to Point to Point,  Angular Measurement,  Bone Density Profile,  Area of a Measurement,  Text Annotations.

Placing an Implant

Saving a Project

 Saving a Project,  Adding a Description to the Project,  Locating the Project.

Burning to CD

Recording to a CD/DVD, or USB Drive.

The Seven Most Common Questions When Implementing a New Dental Intraoral Sensor System

One of the biggest challenges that dental offices face with digital sensors is knowing whether things will work together.  It seems like it should be so simple to just add or replace a sensor.  However, for so many offices in this situation, they will hear high-priced imaging systems claim “nothing else will work”, while low-priced systems may claim “it will work with everything”.

The reality is usually somewhere in the middle depending not only on what systems are currently being used, but also what your needs and expectations are.  More and more, we are hearing from dental professionals who want to understand the tradeoffs more clearly.  The reason is that with a little knowledge, the office can save quite a bit of money without sacrificing image quality or workflow efficiency.   

With this goal in mind, we wanted to shed some light on some of the most common questions we hear from dental professionals when they are looking to implement a new dental digital intraoral sensor system.

1. Does the intraoral dental sensor need to be compatible with my x-ray unit? Typically, you do not need to worry about compatibility between your intraoral dental sensor and your intraoral x-ray unit as most sensors will work with most x-ray units.  While the optimal settings on that intraoral x-ray unit may vary somewhat for that particular sensor (e.g. using handheld x-rays), this is easily adjustable. Therefore, a sensor will work with almost any intraoral x-ray unit.

2. What’s the difference between a size 0, size 1, size 1.5, and a size 2 sensor? A size 2 sensor is typically referred to as an “adult” size sensor.  Typically, manufacturers who offer a size 2 sensor also offer a size 1, or a “pedo” sensor.  Alternatively, some manufacturers offer a single 1.5 size which is meant to be a size in between a size 1 and a size 2. The tradeoff with any size sensor is patient comfort vs. size of the field of view.  A larger sensor will have a larger field of view (and therefore, more diagnostic value).  However, a larger sensor also tends to be less comfortable for the patient.  Some offices may prefer the size 1.5 as a “one size fits all”, while other offices may prefer the larger FOV that a size 2 brings for adults, while also having a size 1 that a child will be able to fit in their mouth.

The size 0 sensor is a very small sensor often times offered as an even smaller pedo sensor.  Here’s a fun fact about the size zero sensor:  the origin of this sized sensor stems from manufacturers looking for ways to better utilize the excess sensor material that would otherwise have been scrapped (because cutting rectangular sensors from a round “wafer” results in leftover material).   There was little incremental cost to make this excess material into an even smaller sensor (because the material would have been scrapped anyway). This tiny sensor was labelled a “size 0”, and it has a very small field of view.

3. Can I move my sensors between rooms? Absolutely.  Most modern sensors have simple connections to the USB port of a PC.

4. Is it easy to change sensor systems? Frequently, the answer to this question depends both on the system you are using and what’s important to you. It’s first worth a quick explanation of the relationship between the sensor, the imaging software, and the practice management software. 


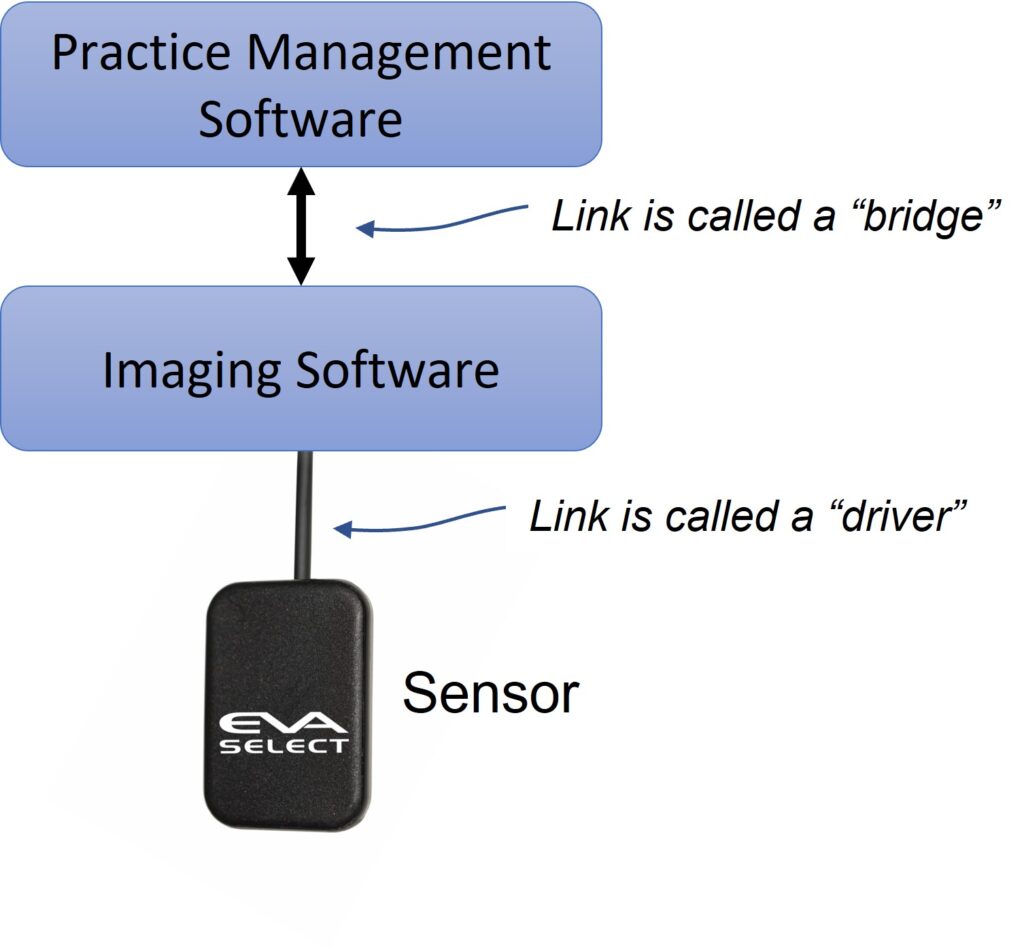
In most digital systems, the sensor is controlled by the imaging software, so the ability of the system to work is dependent on the ability of the imaging software to control that sensor. Many times, people simply think of the sensor as an independent piece of hardware, like the tire of a car that can be easily changed.  While this is becoming more common, it’s more accurate to think of the sensor and the imaging software as one system.  Therefore, answering this question is usually dependent on the ability of your imaging software to accept other sensors, as well as the ability of your sensor to work with your imaging software.  Some more detail of typical scenarios are explained below.

It’s also worth noting that sometimes the imaging software may actually be provided by the practice management software provider.  In these cases, it can be confusing because it may not seem like there is a separate software for the imaging.


5. Can I use any sensor with my current imaging software?   As mentioned above, the answer to this question depends not only on the system you are using, but also on what’s important to you. Typically, plugging a sensor into a PC that uses another imaging software results in one of three common scenarios:

Scenario One:  the imaging software cannot accept the image captured by the sensor.  The sensor will not work with the software.

Scenario Two:  the imaging software can capture the image, but the software will not offer any “capture automation” capabilities for that sensor.  For example, during a multi-image study, the user may have to click to accept each image in the software before moving to the next position.  Sometimes, the user may also have to manually rotate and place the images in the correct charting position.

Scenario Three:  the software can capture an image and apply the same automation capabilities that its own sensor would have.

Some offices may see Scenario Two as unacceptable, while other offices may be ok with this if they are saving money. To further complicate matters, sometimes either the imaging software or the sensor (or both) may have the potential to work together to achieve Scenario Two or Three above, but they may require additional pieces of software to do so.   In most cases, this additional software comes from the sensor provider, and is called a “driver”.  A “driver” is a generic term for a small piece of software that is provided by the hardware manufacturer to “handshake” with a larger software application (e.g. a “TWAIN” driver is a very common one).   It’s also worth noting that at least one large software provider charges fees simply to allow someone else’s sensor driver to work with their software.

6. I would like to (or need to) change my imaging software.  Does my imaging software need to work with my practice management software?   The communication between the imaging software and the practice management software is typically referred to as a “bridge” (see image above).  First, it’s worth mentioning that the imaging software can operate independently from the practice management system (i.e. without a bridge).  However, if they do work together, there are some workflow advantages to this.  Typically, the bridge offers two things:

1. The ability to open the imaging software directly from the Practice Management software, so that less clicks are required, and the patient being imaged will be automatically selected in the imaging software (i.e. no need to search for patient again in the imaging software after the patient was already looked up in the practice management system).

2. For new patients, the patient information that is entered into the Practice Management system is automatically updated into the imaging software thereby avoiding redundant data entry for new patients.

In general, the bridge will make the user feel like the practice management software and imaging software are one piece of software.


7. If I change my imaging software, what should I do with all the images that are stored in my current software? Typically, the imaging software is what stores and manages all your digital x-ray images.  If you change your imaging software, new images will be stored and managed in the new imaging software.  Assuming the new software is not able to simply connect directly with the existing database of images, typically, you have two main options for what to do with the images in your old software.

Option one, is to simply keep a copy of the older software that you already have and use it to access the older images.  These images would also typically be archived and backed up as part of the normal IT best practices.   With this approach, there is usually a short period where comparing images taken at different times for a patient would require either printing, or exporting certain studies. However, after a short period, the need to refer to older images becomes less and less frequent.

Option two applies if both the old software platform and the new software platform are compatible.  If they are, the images may be able to be “ported” to the new software so that the old images would be available in the same place as the new images.  Typically, if porting is possible between the two software platforms, it would be a separate service that would be offered by the software company for an additional charge.

The digital intraoral dental sensor is a critical component for a busy dental practice. Understanding some of key components involved in implementing a new sensor in your office will help your team make the most of their investment as well as make sure there are no surprises.

If you have any questions, or would like to better understand the tradeoffs of different options, please reach out to talk to one of our specialists.


Subscribe to Receive More Great Articles

    Five Crucial Questions to Ask When Buying a Dental Intraoral X-Ray Unit

    Whether you are installing a dental intraoral x-ray in a new office, or you need to replace an old unit, it’s helpful to go into the process eyes wide open. In many cases, the questions below can be answered by the company providing your dental intraoral x-ray. However, it helps to understand all the requirements so that there are no surprises that cause delays or additional costs.

    1. Does it matter whether it’s a DC or AC x-ray? To answer this, it’s worth a quick explanation of the fundamental difference between a DC x-ray and an AC x-ray. Both types of wall mounted intraoral x-rays in a dental office (whether it is a DC x-ray or an AC x-ray) are powered by basic AC electricity that comes from the wall. The difference between a DC x-ray and an AC x-ray lies in what they do with that incoming electricity.

    The incoming AC electricity is like a sine wave: it has pulses that go up and down. The power level (or intensity) of the x-ray generated by an AC x-ray matches this sine wave shape, and the actual x-ray power coming out of the machine oscillates at 60 times per second – like the input electricity.

    A DC dental intraoral x-ray changes this input electricity so that the x-ray coming out of the unit is a single pulse that maintains more of a consistent power level through the entire exposure.

    This difference in the profile of the x-ray output results in two subtle effects.

    First, the “up and down” nature of the AC x-ray output creates more radiation when all other parameters are equal. Every time the power level is below a certain threshold, it is emitting radiation that is not having an impact on image quality (some refer to this as “soft radiation”). In other words, there is a small dose to the patient, but because it is below the sensitivity threshold of the film or sensor that’s capturing the image, it has no impact on the image. For AC x-ray, the power level is dipping below this threshhold 60 times per second, and therefore is emitting more of this soft radiation than a DC intraoral x-ray.

    Second, there may be less consistent image quality when all other parameters are equal. If your exposure is 0.04 seconds in duration (not an uncommon setting), that’s only 2.5 “pulses” with an AC x-ray (because they occur 60 times per second). However, depending on the exact timing, the reality of that particular exposure could be 3 “peaks” and 2 “valleys”, or could be the other way around. This difference can create a slight inconsistency in the amount of exposure the sensor or film actually receives. In other words, two exposures taken with exactly the same parameters may have slightly different levels of energy applied to the sensor for an AC x-ray.

    You may ask: why would anyone buy an AC x-ray? The answer is two-fold. First, there may be a price advantage with the AC x-ray. Second, the differences in both dosage and radiation are very slight, and both of these results are well within the federal requirements for these pieces of equipment.

    2. Do I need a different dental intraoral x-ray if I am using film instead of digital sensors? The short answer is: typically no.

    Typically, the amount of x-ray energy required to generate ideal images with film is higher than that required for a digital sensor. However, almost all intraoral x-ray units today have the ability to adjust settings. For most intraoral x-ray units, increasing the output power is done by simply switching the unit to a mode that increases the time (or duration) of the exposures (typically this is shown in milliseconds, or ms).

    As an aside, if you are using film, the ideal parameters would also vary depending on which type of film you use (D speed, E speed, F speed, etc). Film speeds labelled as “slower” (like D-speed) require more energy to create the image than “faster” film speeds (like F-speed).

    3. What shielding is required in the office? The official requirements will vary by state (and in some cases, by locality). However, here are some guidelines to consider.

    The two most common characteristics of the office that are typically specified as requirements for intraoral x-ray operation are distance and wall material (sometimes referred to as “distance and density”). The reason for this is that these are two very effective protections against radiation.

    Sometimes simply having 6 feet spacing between the intraoral x-ray and an operator is sufficient and no walls are required. Sometimes, a basic wall (typically referred to as “drywall” or “gypsum”) is required to separate the x-ray and the operator. Typically, most states will have some variation of these requirements. Rarely are lead-lined walls required for intraoral x-rays in dental offices. However, some state may require this if there is a very high volume of exposures being taken.

    4. Can I have my repair person install my intraoral x-ray? Most states require that the intraoral x-ray be installed by a person who has registered with the state as a qualified installer. Therefore, if your repair guy has registered, then: “yes”. Otherwise, you want to make sure you are using a certified installer.

    One of the ways the FDA monitors this is through a form that is filled out by the installer called the FDA 2579 form. The installer is required to complete this form, and then send one copy to the FDA and one copy to the state. A third copy is provided to the office, which is responsible for keeping a copy of this form to document that the piece of equipment was properly installed. It’s important to keep your copy, because it is common in many states that an inspector will come to the office periodically asking to see this document for each x-ray unit.

    5. Do I need a wall-mounted unit, a mobile unit, or a handheld unit? This is a fundamental question that depends on your office needs. Handheld and mobile x-rays offer some economies of scale as they can be shared between rooms. However, there are performance aspects of a wall-mounted and a mobile unit that are often preferable to a handheld x-ray. For more on this question, see our post sharing more detail on these tradeoffs:
    The Most Overlooked Pitfall of a Handheld X-Ray That Can Cost Your Practice Money

    The intraoral dental x-ray is a critical component to a busy dental practice. Understanding some of key components involved in having a new intraoral x-ray installed in your office will help your team make sure there are no surprises.

    If you have any questions about this process, please give us a call to talk to one of our specialists.


    Call: 914-592-6100

    Email: custserv@imageworkscorporation.com


    Subscribe to Receive More Great Articles

      Six Surprising Pitfalls of Handheld Dental X-Rays that Can Cost Money

      Handheld X-Rays have been an appealing solution to many offices who like the idea of avoiding the cost of purchasing an x-ray for every operatory. However, before deciding if this solution is right for your office, it’s critical to know the entire picture. While the cost savings of not buying an x-ray for each operatory is attractive, there are six hidden pitfalls about handheld x-ray units that could have an impact on your practice.

      1. It’s harder to take consistently good x-rays with a handheld. The reason for this is that handheld x-rays emit x-ray at a lower power than a high-quality wall mounted or mobile x-ray. The key spec to examine with a handheld is the amperage, or current output, which is designated in mA (or milliamps). Many of the handheld x-rays have an output as low as 2 mA or 2.5 mA, while a wall mounted or mobile x-ray is typically about 8 mA. X-Ray power is proportional to the mA, so if all other parameters are similar, a 2 mA handheld generates an x-ray with about one quarter of the power of an 8 mA x-ray. When output power is lower, it is harder for the sensor or film to separate the signal from the noise, and this can result in lower image quality. With a handheld, a typical approach to compensate for this lower power is to increase the time of the exposure. However, with longer exposures come additional challenges in keeping both the patient and the x-ray still. Maintaining this stability for the duration can be challenging for some offices.

      2. Forgetting to charge the handheld x-ray may disrupt your office. Most of the handheld units operate on a lithium-ion battery pack, and many cannot be operated without a charged battery. Usually, these battery packs last about 100 – 200 images. The challenge that many busy offices have is that if it’s not someone’s job to charge the battery pack when it’s needed, it may not get done. Eventually, this means that at some point, there is a good chance that your staff will grab the handheld with a patient in the chair, and it will be dead. Having a back-up battery pack may seem like a fail-proof solution. However, if that back up wasn’t placed on the charger, or if the back up wasn’t used for an extended period of time, then the back up may also be dead.

      3. The hygienist has to carry the handheld during the radiological exam. Most of the handheld units weigh about 5 lbs, which is about the same as a large bag of flour. Over time, this additional fatigue can weigh on the staff. Also, because the operator no longer has free hands, the unit must be put down to make adjustments to the patient, which can further reduce productivity. In addition, because the entire weight of the unit must be held up and supported by the operator, aiming the unit freehand becomes more challenging. Also, remember that because of the low power level, more precise technique is required to get a good image. Yet, it’s harder to achieve good technique because it’s a heavy item that must be operated “freehand”.

      4. There will be a longer wait between exposures, so studies may take longer. The duty cycle (sometimes called the “duty factor”) tells you how long any x-ray needs to wait before it’s ready for the next shot. It represents the ratio of the exposure time to the wait time. Some wall mounted and mobile x-rays have a duty cycle that is a ratio of 1 to 15 (usually represented in a spec sheet as 1:15). This means that if the exposure lasts one quarter of a second, then the x-ray will be ready in less than 4 seconds (15 x 0.25 = 3.75). Many handheld units have a duty cycle of 1 to 60 (1:60) or worse. Therefore, that same quarter second exposure now means the operator has to wait 15 seconds until the next exposure. However, remember that a common way to compensate for the lower power is to increase the exposure time. Therefore, this wait time can be even longer if the exposure time is increased. If you increase the exposure to 0.5 seconds, now the operator has to wait a half minute between exposures. If you apply this to an adult FMX study, this can equate to almost 10 minutes of extra time per patient. Also, as mentioned above, the hygienist is carrying the handheld unit for some part of this extended period which contributes to fatigue, which can further hinder her ability to use the good technique required to get good images.

      5. Distance is one of the most effective protections against radiation. For the operators that are using the equipment day in and day out, they are the ones who are most at risk of long term exposure. All things being equal, the effective dosage when you are one foot away from a radiation source is 100 times the effective dosage as when you are 10 feet away from that same source (for the math geeks following at home: it is an inverse square relationship).

      6. Regulations on handheld x-rays vary by state and by manufacturer. Because of the concerns that the regulating bodies have with safety of handheld x-ray units, they are monitoring these products very closely. As a result, each state approaches them differently, and many of them create unique rules for different manufacturers. These regulations can vary from requiring additional protective aprons and gloves for the operator, to requiring that the office institute a radiation monitoring program. Some models may even be illegal in certain states.

      For many offices, there is another option that provides the same, if not better cost advantage as the handheld, while at the same time avoiding the concerns mentioned above. This is the Mobile Intraskan DC Intraoral X-Ray from ImageWorks.

      The Mobile ImageScan HD Intraoral X-Ray provides:
      The ability to move one x-ray between operatories and avoid the cost of additional x-ray units in every room
      High power output (5 mA) that assures high quality images even if technique is less than perfect
      Motionless positioning that is supported by the unit, not the operator
      A convenient industrial-strength power cord which plugs into any standard wall outlet. Perfect for moving between operatories
      A robust, life-cycle tested design that assures positioning is rock-solid for years of operation
      No need for operator to carry around equipment, which reduces staff fatigue
      A trigger switch that allows the operator to leave the room during the x-ray
      A patented design to eliminate radiation leakage, which further enhances operator safety
      A compact footprint with high-performance wheels enabling smooth and agile maneuvering through the office
      A lower cost than many handheld x-rays


      Fill out the form below, and an imaging specialist will reach out for a 10 minute introduction

        Your Name

        Your Email

        Phone Number

        Ideal Dates and Times to call

        Any additional useful information

        Panoura 18S CBCT Training

        Opening a Volume

        Opening Volumes and Projects.

        Navigating the Software Part 1

        View Images in of the Various Tabs and Views.

        Navigating the Software Part 2

        Navigating the Location within the Volume, and Changing the Angle of the View.

        Navigating the Software Part 3

        Manipulating the 3D Reconstruction.

        Tracing the Arch

        Tracing the Nerve

        Measurement Toolbar

        Point to Point Measurement,  Tape Measurement,  Point to Point to Point,  Angular Measurement,  Bone Density Profile,  Area of a Measurement,  Text Annotations.

        Placing an Implant

        Saving a Project

         Saving a Project,  Adding a Description to the Project,  Locating the Project.

        Burning to CD

        Recording to a CD/DVD, or USB Drive.